Monday, January 23, 2012

Anthropologie-Inspired Braided Headwrap

Anthropologie Braided Headwrap

My recent project, an Anthropologie-inpsired Braided Headwrap by Jen Geigley, has quickly become my favourite thing I've knitted. I will wear this and I will wear it until the yarn breaks apart. It's the perfect width, the yarn is super warm and its comfortable. I used Lion Brand Wool-Ease Thick & Quick yarn in Charcoal and size US 13 needles to complete the headwrap. It's also super fast to finish. I was watching the Giants vs. 49ers football game (yes, I knit and watch sports and realize I'm the biggest contradiction) and it took approxiamtely 3 hours from cast on to cast off.

Head on over to Ravelry.com to pick up this amazing free pattern.

Happy Knitting!

Saturday, January 21, 2012

Outside my window

While I very much dislike snow (anything that causes cancellations is not a friend of mine), I can't discount how beautiful the town looks after a fresh blanket of the stuff falls. This is the second day of snow (and thus shovelling) we've had this week. 

Friday, January 20, 2012

Knitting 101!

Since I've started posting pictures of my knitting successes on Facebook and here on my blog, I've had so many friends comment and say they've been inspired to start knitting themselves, or wanted to learn. How great is that? It's lovely to hear.

In my opinion, knitting is best learned from someone else, hands on and visually. Sure, you can pick up a book with lots of pictures, but pictures can't show you the direction you move the yarn or smaller intricacies of the different stitches. Coming from Newfoundland, a culture where knitting and other forms of needlework was such a large part of rural society (from necessity to a form of social gathering amongst women), learning to knit is the best passed down from generation to generation, like many other traditional artforms (music and storytelling being the most common here in Newfoundland).

That being said, times are different. In a culture where convenience often trumps creativity, finding someone to teach you how to knit isn't easy. While I had my mother to show me the basics, with modern technology, it's possible to learn to knit without your grandmother sitting next to you telling you when to wrap the yarn around the needle.

Youtube is the best source of 'how-to' videos for beginner knitters. When I start a new project and find myself stumped on a new type of stitch ("what the hell does 'psso' mean?), the first thing I do is type it into youtube. And I'm often greeted by thousands of videos explaining the stitch and showing me how it's done! But if you've never picked up a set of knitting needles before, you need to know what to look out for before you start knitting. So let me share with you what I think are the best videos on youtube that will help you learn to knit.

Step One: Look for a pattern on ravelry.com. If you don't own any supplies, you'll need to find a pattern that's super easy like this one by Elisa McLaughlin and find out what you'll need to buy/borrow to complete the project. The ravelry page will tell you what SIZE needles you need (US 9 - 5.5 mm in this case) and the type of yarn to buy (for this pattern it's WORSTED, the most common type/size of yarn). If you have a Walmart near by, you can get all these things there for quite cheap.

NOTE: This pattern is great because it comes with its own video tutorials.

Step Two: Once you have your needles and yarn, you are ready to get started. This pattern tells you that you have to CAST ON 20 stitches on your needle. So you need to know how to cast on. You can visit the video linked in the pattern, or my favourite is done by the Knitwitch.


Step Three: 

After you've CAST ON 20 stitches, the pattern then requires you to knit for 86 rows (to knit every 20 stitches on your needle, 86 times). So you need to know the KNIT STITCH. Here's the video.


Step Four: 

The other most common stitch is the PURL STITCH. You'll need to learn this one. 


Step Five:

When you're finished all the required stitches/rows, the pattern will then tell you to CAST OFF or BIND OFF the last row to finish your project. The easiest beginner way of doing this is the KNITTED CAST OFF. Here's how you do it.


That should be it. Cast on, knit, purl and cast off. Those are the four basic techniques you need to know in order to start knitting. In the future, I'll post tutorials or videos from others explaining some more advanced stitches (Seed, Cable, lace etc), but this should keep you busy for the next while.

Happy Knitting!

Wednesday, January 18, 2012

Must watch: Downton Abbey!

It just won the Golden Globe for Best Television Mini-Series and if you haven't been watching Downton Abbey, stop everything you are doing and press play. Pride and Prejudice meets Gosford Park, this British tv series is visually stunning and the acting is out of this world. Maggie Smith steals the show with her snarky portrayal of the Dowager Countess of Grantham but the real heart of the show is found in the sordid love affairs of Lady Mary Crowley and Matthew and their lower-class counterparts, the servants who hide the secrets of the Crowley family. Secrets, lies, and messed up socialite families. What's not to love?

Sit back and enjoy.


Tuesday, January 17, 2012

Moss Fields Headwarmer

Moss/Seed stitch headwarmer

What an easy and lovely project to complete. I've never tried moss stitch (also called 'seed stitch) before but I'm absolutely in love with it! It looks very uniform and full when you finally start to see it come together (after 4-5 rows). It's also extremely warm because the stitches are very close together. But before I go any further talking about the headwarmer, I should show you the pattern! Interested knitters can visit the DROPS Design website to look at the pattern for Strawberry Fields (I've renamed it for my purposes because I didn't use red wool).

MOSS ST:
1st row: * K 1, P 1 *, repeat from *-*. 
2nd row: K over P and P over K. Repeat 2nd row.
--------------------------------------------------------
HEAD BAND: 
Worked back and forth on straight needles. 
Cast on 13 sts on needle size 9 mm with Eskimo. Work in MOSS ST - see explanation above - until piece measures approx. 55 cm. Cast off sts with K over K and P over P. Sew tog with neat stitches to make the seam invisible.
For the strip, cast on 15 sts on needle size 9 mm with Eskimo. Work in moss st until piece measures approx. 4 cm. Cast off sts with K over K and P over P. Fold this strip around the head band. 
Sew tog on the back with neat stitches to make the seam invisible.


Making this headwarmer took me about 3-4 hours from start to finish, so its a super quick project to do. I used Loops & Threads Cozy Wool (Super Bulky) in Mushroom and size US 13 needles.

Important notes:
- Moss stitch is the same as seed stitch. Moss stitch is UK, seed stitch the is US term. 
- The pattern says alternate rows until you reach a length of 55cm (or 21.65 inches), but I'd actually recommend a 53cm length for a more snug fit.
- The strip you create to bunch up the headwarmer could reach a 5-6cm length if you wanted a less, bunched up look. I also wear the strip to the side of my head, but it's meant to be worn on your forehead. I found it looked too big. How you wear this headwarmer is totally up to you and how you want it to look.

Happy knitting!

Monday, January 16, 2012

New Music: Kathleen Edwards - Voyageur


Do yourself a favour. Brew up a pot of tea. Set out the milk and sugar. Then press play on Kathleen Edward's new album "Voyageur". She's one of the best Canadian indie-folk singer-songwriters (I know... a mouthfull, but true!) and there is no better way to spend your winter afternoon. This album, produced by boyfriend Justin Vernon (most people know him as Bon Iver), will be sure to warm up the cockles of your heart.

Check out the album HERE

Happy listening! 


Cable Knit Cowl

My very first project!

I completed this project a couple of weeks ago. I received my first cowl as a Christmas gift from my sister and wanted to try to make one myself. So I did! I scoured ravelry.com for a pattern that used large needles (US 17 in this case) and the appropriate size wool I had found at Walmart (Bernat Roving - Bulky) and came across this pattern by Maria Olson. I absolutely love the result. It's just long enough to cover my entire neck and the roving wool is light, but warm. It's also short enough that you have your neck covered but you don't have to worry about a bulky scarf making it difficult to zip/button up your already bulky winter jacket. Being from Newfoundland, where it's currently -12 below, this was a wonderful addition to my winter wardrobe!

If you are trying to complete this project yourself and you are a new knitter, familiarize yourself with the cable stitch through this Youtube video. You will also need a cable stitch holder ($2-3) or just an extra knitting needle to hold the three stitches needed to make the cross-over pattern that forms the cable stitch. Other than that, the pattern only calls for the knit and pearl stitch, which are your basic two knitting stitches. 

I also suggest casting on using both needles put together if you are a tight knitter like me. If you plan to add buttons to the end of this scarf, your stitches need to be slightly loose in order to allow the buttons to pass through without button holes. 

NOTE: The last three rows of stitches in this pattern show you how to knit button holes into your scarf. If you are using a bulkier wool and larger needles US 17 or US 19, you don't need button holes as the buttons should be able to hook through the spaces in the stitches fairly easily. If you do not want button holes, follow the pattern for Rows 1, 2 and 3 at the beginning of the pattern and then cast off.

I hope you have fun with this pattern if you decide to try your hand at it. While it isn't my pattern, if you have any questions, I can try to help as much as I can.

Happy knitting!


Sunday, January 15, 2012

Baking: Petits Pains au Chocolat

Ingredients 

1pkg frozen filo pastry (I've used 3 sheets for 1 roll)
Butter flavoured cooking spray
1/2 - 3/4 cup of chopped milk chocolate
1tbsp of cinnamon
1/2 cup of sugar


Filo pastry, cooking spray, chocolate chips (substituted for solid chocolate), cinnamon and sugar


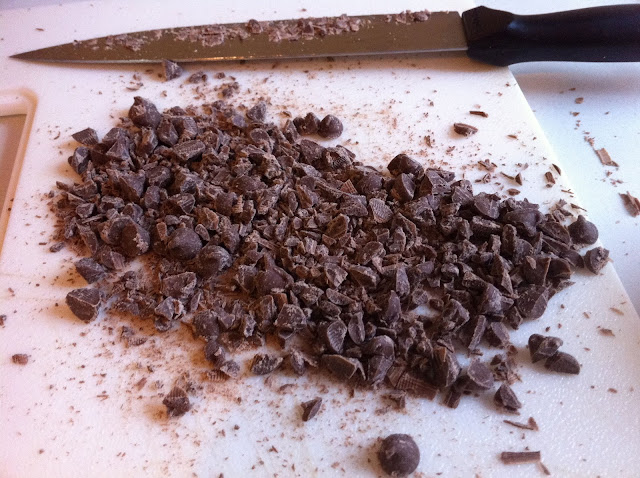
I couldn't find solid mik chocolate at the local grocery story, so I took chocolate chips and chopped them with a large knife.

You lay out 3 pieces of filo pastry, spraying the top of each sheet with cooking spray or an egg glaze before placing the next one on top of it. I then spread out the chopped chocolate on the bottom of the pastry along the width and rolled it up into a cylinder from bottom to top.

Put the sugar in with the cinnamon and whisk until incorporated.

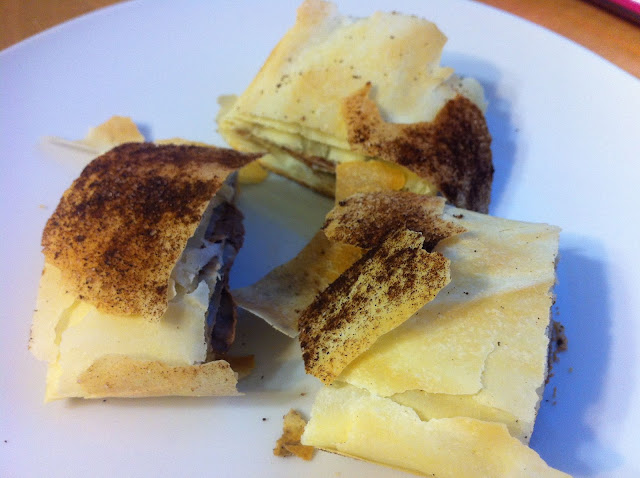
Sprinkle the cinnamon and sugar mix along top of the roll before placing into the oven for 8-10 minutes at 400℃
Cut up the roll into sections and serve!
I learned this dessert last week at the cooking class I've enrolled in at the local grocery store. It's super easy and quick to make. Really glad I tried it out at home.


Welcome!


Loops & Threads - Cozy Wool.

Hi everyone! Welcome to my blog. Glad to see you and I hope you stick around to keep up with the posts and photography I post over the coming year. I started a version of this blog late last year, but felt it didn't really have a focus. So since it's the new year, I decided that it was time to revamp the whole thing and focus on the new hobby I've taken up, knitting. 

I've always been in search of a hobby to stick to. Since moving back home, I'd taken up cross stitching again (I've never been far from a needlework project), baking cupcakes, painting/drawing and endless time spent reading. While I enjoy all of these things, I never really stuck to either. A cross stitch project could take months to finish, I'd bake cupcakes then they'd disappear the next day, and anything I drew was quickly hid behind the cover of my sketch book. I needed something tangible, with a product I could get use of. Why waste my time making something I won't do anything with when it's finished -  baking aside! Knitting seems to be the answer. 

With no specific resolution to pick up a new hobby, I found myself pulling the wool basket out of my mother's closet, organizing her needles, signing up for ravelry.com and casting on. I'm not entirely new to knitting though. I didn't pick up a set of needles last week for the first time. My mother had taught me the fundamentals of knitting when I was in high school, but knowing it wasn't considered "cool", I never did anything with the knowledge. But for a substitute teacher living in rural Newfoundland, Canada, I now have plenty of time and no concern for the opinions of high school kids (in relation to my personal life at least!). Since the beginning of the year, I've recently finished my first ever project, a cable knit buttoned cowl and two hats. I felt very inspired when I casted off that last stitch and had a scarf in my hands that I had made with my own two hands. And proud! Was I ever proud. 

On The Rural Knitter, I hope to not only share my creations, but post patterns that I find, stitches and techniques I've learned and a few photos along the way. And of course, there will be other posts: bands I just heard of and need to share, cupcake recipes and the like. Stay tuned!